Showing posts with label HACK PHONE. Show all posts

Sunday, November 28, 2010

Get Your Signing Certificate ( .cer and .key) within 3 minutes using XStevedore


Get Your Signing Certificate ( .cer and .key) within 3 minutes using XStevedore
No need to Register Anywhere.
No need to submit your IMEI.
Just Install The Application and Follow the Steps.


This post gives you a step by step description to Get your own .cer and .key file using XStevedore with the help of screen shots.

The things you must have:
1. A Nokia Symbian Phone with Internet
2. XStevedore Signed.sisx - Download

XStevedore is a Chinese application so you can't read so i am added the screen shots follow the screen shots well.
Lets Start The Procedure
1. Download and install XStevedore.sisx

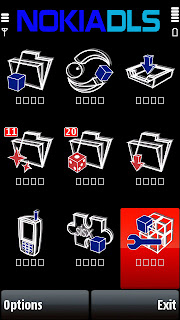
2. Open The Application (Click the red highlighted icon)
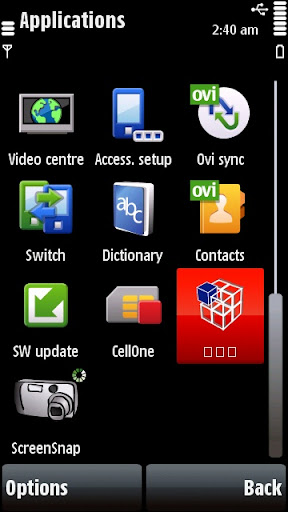

3.Now you will get a screen like below. Goto the last item "Settings"(red highlighted) click it .


4. It will Prompt a warning Click Left (red highlighted)


5. It will open a window with 3 options like below.


1. Connection - Click on it and select the gprs connection or Wi-Fi.
( I am selected "BSNL Internet" as its my connection name)
2. Download Path - Click on it and select E:\ (MMC)
3. No need to click the 3rd option
Click Back

6. Now it will go back to the first window like we opened before goto the second last one "Signature "(red highlighted one) and click on it


7. It will Prompt a warning Click Left (red highlighted)


8. Now you will get a window like below


9. Click Options -- second one -- again second one (Download) like the picture below (red highlighted)


10. After loading it will prompt you to select memory ,select MMC press OK and enter the name (default name is "Mycer"). press OK.


After downloading You will get a window like below.


You are done it..!!!
Click Back and Exit the Application.

Now Check For Folder "MyCert" in your MMC vial File browser.
You will get the folder with two files "MyCert.cer" and "MyCert.key".


I am Successfully Did it in my 5800. Please check it and comment here thanks.

If Any One Feels its Difficult Click Here To Get The Alternate method which works for every one.

Read more...

Sunday, November 21, 2010

Sign Unsigned Applications Using Sis Editor

Sign Unsigned Applications Using Sis Editor
No more certificate Error ...!!
This post gives you a step by step description about Adding your signature (.cer and .key file) and Signing unsigned Application using sis Editor v0.70 with the help of screen shots.

The things you must have is .cer and .key file based on your IMEI and sis Editor.
Download sis Editor v0.70 signed Full
Get your signing .cer and .key
If you allready have the Application and .cer and .key skip it.

Adding Your Signature( .cer and .key File) to the sis Editor signature list.

 
1. Place your .cer and .key file in your phone or MMC in any folder.
eg: E:\Others\myCertificate
2. Open SIS Editor
3. Go to Options--Signature--Certificate management


4. Now you will see a page Contains Two Signatures (1.Self Sign 2.BiNPDA)


5. Go to Options--Add certificate


6. Now you will see a page with 3 menu (Certificate name , Certificate file , Private key file) Give any name to Certificate name:(eg: myOPDAcer)


7. Now click on Certificate file:
Options--Browse file
(Browse and select the .cer file in your phone where you saved in your MMC or Phone)
then click on Private key file:
Options--Browse file
(Browse and select the .key file in your phone where you saved in your MMC or Phone)


8. After selecting your .cer and .key file
Go to Options--Save

Done ...! Click Back

Now you will see 3 certificates include one which created by you.

Click Back--Exit

You need to do it only one time ,your added signature will remain in the list untill you delete or remove the sis editor.
Yes you did it you are success fully added your signature to the list.

Steps To Sign Your Unsigned Application Using Your Added Signature.

1. Open SIS Editor

2. Go to Options--Signature--Sign package


3. Now it will give a page to browse the unsigned application that you want to sign
Browse and select it (eg: i am browsed Quick Office 6)

4. Now you will get "Please select signature:" page showing the three signatures include your created one.
Select your signature that you created I am selected MyOPDAcer as i am named it so.


5. Now go to Options--Save file
and Save anywhere you like


Done EXIT
Yes Now You successfully signed your unsigned Application. Please comment here if you face any error.

Read more...

Friday, February 12, 2010

HelloOX2v2.03 for S60v5 and S60v3


HelloOX2 is an One step Hacking tool for all Symbian S60 3rd & 5th phone.

Hacking mean that it can get full access to your phone's system folders and files, with this capability, HelloOX2 could install a root certificate to your phone, and with the root cer & key pair you could sign any apps to install, include the Manufacturer capabilities requested apps. Completely fix annoying certificate error!

for example:
ROMPatcher+ is a Manufacturer capabilities requested app, using it to patch the installserver you'll be able to install any apps without signing anymore, but the only way to install it is Hacking your phone.

How to use it?


Hacking:
Install to your phone, run it after install. All steps run automatic, just wait and see.

UnHacking:
run HelloOX2 again after Hack, it'll prompt a menu let you choose UnHack or Hack again.


To Install Helloox2 to your phone you have to sign it using OPDA certificate and Key
Click Here To Get Your Own OPDA .cer and .key

To Sign Helloox2 with OPDA .cer and .key Download
FreeSignerv1.0 From Here

Read more...

Get Your own OPDA Certificate and Key

Get Your own OPDA Certificate and Key
What is OPDA Certificate and Key.

We are using OPDA Certificate and Key to Sign Unsigned Application.
(While installing unsigned Application We get warning 'Certificate Error')
Ok Just Follow this Simple step to get your OPDA .Cer and Key

1. Go to http://cer.opda.cn/en/
2. Register a free account there by clicking Register @ Top right
3. After Complete the Registration login to your account
5. Wait 5 sec or Click on My Certificate link
6. Click Apply cer button
7. Fill the Details Done....!!!
You will get your cer and key with in 24hours.

How to Download .key and .cer from your OPDA account?

When you login to your account you will see right of your IMEI like this

1. Click On the .cer to download the certificate.


2. Click On the .key to download the key file.


Done...!!!

If It Take TOO Much Time To Get Your .cer and Key
Click Here

Sign Unsigned using FreeSigner
Or
Sign Unsigned using SisEditor

Read more...
Follow